
If you've ever wanted to try chip carving, then you've probably noticed that it can be a challenging task. There are many styles and techniques you can use, but which one is the best? What tools do I need? In this article, I'll share my tips and tricks for carving chips, and help you decide which one is right for you. There are many key ingredients to successful chip carving, no matter how traditional your style.
Traditional
Chip carving can be considered one of the oldest forms in decorative woodcarving. It requires a straight-edged knife but a skew-ground or offset blade knife can also be used. Chip carving involves making small triangular cuts in wood to create patterns. This art form began over 1,000 years ago and evolved simultaneously in many different lands. Because of its widespread popularity, the designs were often so similar across nationalities that it was impossible to discern one from another.
As woodcarving became more widespread, the skills necessary to do the job were handed down from one generation to the next. Chip carving was used in Sweden to decorate furniture. Schools were eventually established to teach this art. Modern chip carvers are able to benefit from the centuries-old skills and knowledge of carvers. Through the generations, knowledge was passed from carver to apprentice to student. It's a lifelong process that continues today.
No cost for form
If you've always wanted to try chip carving, you've come to the right place. A DVD by Murray Taylor shows you how to create freeform and geometric carvings. It's a good introductory project and contains lots of useful information. English and NTSC versions of the DVD are available. The DVD is also available in widescreen and stereo. Artisan Media Ltd. is owner of the DVD. The DVD can be downloaded in MP4 format on Windows and Mac computers.
Triangles, circles and lines are the basic shapes of geometric chip carving. You can combine different styles with this technique, which allows you to create unlimited patterns and shapes. This technique is also known by the free-form style of chip carving. Your chips can be any shape you like, from a flower to a dragon. It is possible to combine many techniques in one piece using free form chip carving.
Techniques
Chip carving has been practiced for hundreds of years. You can find examples in many countries around the globe. In the South Pacific Islands, for example, chip carving has been found on boat paddles and ceremonial tool handles. Although most of these carvings were done with bits of bone or seashells, some have also reported using shark teeth. This book demonstrates how you can use a variety different chip carving techniques to create incredible designs.
You can easily carve chip if your follow some basic steps. The first is to understand how to carve the fine Triangle. This pattern is simple to follow and understand. Simply carve several triangles and continue this process until you have carved the pattern. It doesn't have to be boring. Simply by changing the angles, you can create amazing patterns.
Tools
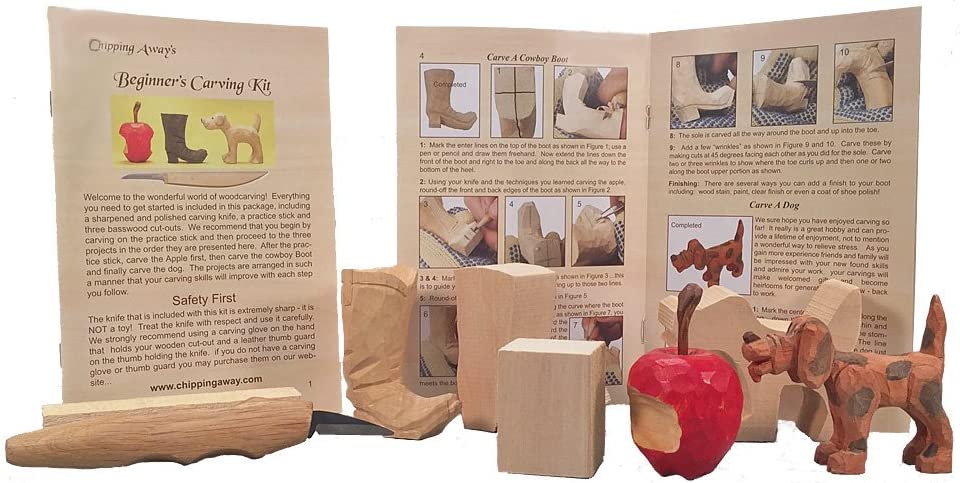
Lora Irish offers an online seminar for free that will cover the basics of chip-carving. She will show you how to use various carving tools, including a stab knife, chip knife, and detail bench knife. Irish will also discuss the different types wood carving tools in this seminar. You can choose from the list below to purchase the right tool for your carving needs. These tools are versatile enough to create simple shapes or intricate designs.
A chip carving knife employs special geometry. It is about one half inch long and has a narrow, curved back edge. This allows for precise incisions. A sharp point is essential to ensure that edges meet perfectly. Also made of stainless steel, chip carving knives come with a sharp point. A chip carving knife should be sharp enough to cut a sliver of wood.
Getting started
It is essential to learn about the methodology of chip carving before you begin. The method you choose will depend on the type and purpose of your carving. To ensure accuracy, it is important to be familiar with the following principles. Chip carving is the art of cutting fine patterns in wood. To create your first chip carving, follow these steps:
When using a chip carving knife, it is essential to sharpen it well. Chip carving knives will have bevels along their blades, which indicates they are primary chip carving knives. The sharpening stones are shaped like diamonds and can create efficient edges. Place the stone at a 10 degree angle. The stone will both sharpen and shave the chip carving knives and tool simultaneously.
FAQ
Where do I get my woodworking supplies?
There are many places where you will find everything that you need. You can visit your local hardware stores, or you can look online at sites like Amazon.com.
You can also look for used furniture at flea markets or garage sales.
What's the difference between a hobbyist and a professional woodworker?
Hobbyists are passionate about making things from wood, while professionals tend to be more focused on the quality and craftsmanship of their work. Hobbyists often take pride in the creations they make and often share them to family and friends. Before they start working on a project, professionals will spend hours researching the designs. They will meticulously plan every detail of their work from choosing the right materials to finishing it.
What material would you recommend to start learning woodworking?
Start with softwoods, such as pine or poplar. Once you feel comfortable with these two, move on to hardwood.
What tools do I need to start as a woodworker and what should I learn?
Woodworking is an art that takes patience and practice. It takes time and practice to master the various techniques and tools required for woodworking.
There are many types of woodworking equipment on the market today. Some prefer to use power tools, while others prefer to use hand tools.
Your choice, however, is up to you. However, you need to ensure that the tool you use is the right one for the job. It may be a good idea to start with a basic set, if possible, if you don’t know much about hand tools.
You might also consider learning how to use the router to create intricate shapes from wood. These are available at most hardware stores.
Statistics
- Most woodworkers agree that lumber moisture needs to be under 10% for building furniture. (woodandshop.com)
- Overall employment of woodworkers is projected to grow 8 percent from 2020 to 2030, about as fast as the average for all occupations. (bls.gov)
- Woodworkers on the lower end of that spectrum, the bottom 10% to be exact, make roughly $24,000 a year, while the top 10% makes $108,000. (zippia.com)
- The U.S. Bureau of Labor Statistics (BLS) estimates that the number of jobs for woodworkers will decline by 4% between 2019 and 2029. (indeed.com)
External Links
How To
How can you measure wood accurately?
Wood measurement can be done using several methods. We use a digital caliper (a tool used to measure distances), a laser level (used to make sure your work surface is flat), and a bubble level (used to make sure your work surface is perpendicular).
A digital caliper has two jaws that open and close. The first jaw holds the object, and the second measures the distance between them. The digital caliper is great for measuring small distances like thicknesses of wood.
Laser levels use an infrared beam of light to project a line across the ground. A red dot is created by the laser. By looking down the line, you can see whether the surface is even or not. For larger surfaces, laser leveling is the best method of checking accuracy.
Bubble levels look similar to a compass. There is a bubble in the center of the device. The device will inform you if the surface is level if the bubble is in the center. The bubble levels can be used to check the accuracy of smaller areas.